So in this app that I am building, I need to integrate an e-signature feature where the user clicks a button, and the PDF file is being sent directly via Docusign to the client to request for signature.
Of course, I don’t have any idea whether this is possible. Luckily, I discovered that Docusign actually has an API service.
In this post, I am going to document everything that I learn about it.
Alright, so first, I followed along to their quickstart guide.
Interesting.
So after initializing the node project and running npm start, I began a command line app that essentially sent a PDF document to an email specified, and, after logging in to my email and signing the document via docusign, cc’ed the signed copy to a cc address I specified.
Exactly what I want!
Now let’s break down the actual code that allowed this to happen.
So going over to package.json, the npm start script simply runs jwtConsole.js.
The jwtConsole.js file basically runs the main() function, which looks like this:
| |
Now, from this script alone, we can tell this function does a few things.
First, it authenticates something (I am guessing the client user permissions) and saves the info in accountInfo.
Then, it gets the args to use by running getArgs(). The various args include: account ID, accessToken, etc.
Finally, it runs the signingViaEmail.sendEnvelope() function, which does the main bulk of the work.
What is signingViaEmail? At the top of the file, you realize it’s another file imported:
const signingViaEmail = require('../lib/eSignature/examples/signingViaEmail');
Now, there’s a lot going on in that file.
Basically, the bulk of the logic that sends emails is implemented in that file instead.
The jwtConsole.js file mainly defines the getArgs, authenticate, and getConsent functions. These things are of course vital in the production environment. But for now, I’ll need to understand the sendEnvelope() function first.
Let’s check it out.
signingViaEmail
This file exports 3 functions: sendEnvelope, makeEnvelope, and document1.
I think the most important thing to understand first is the makeEnvelope function.
This is also the recommended point of entry of understanding under the docusign implementation how-to guide.
The first step to requesting a signature by email is to create an envelope definition.
Making an envelope
| |
In the code above, we define a file, doc3PdfBytes, which reads a file from a local directory and saves it as Buffer. Then, the line:
let env = new docusign.EnvelopeDefinition();
creates a new envelope definition. But what, first of all, is a Docusign envelope?
According to this write-up, “an envelope object is an overall container for a Docusign transactions. It contains:
- one or more documents that will be signed electronically,
- information about the sender,
- information about the recipient, including all other objects (such as Tabs) that are associated with those recipients, and
- status information that tracks delivery and signature progress.
Very interesting!
From this, it seems to be a classic data object that is sent around, and containing everything you’ll need to process the transaction. Cool. Before we go ahead to send the documents, we put it into an envelope.
Now, a bit more information about envelopes.
Every envelope is identified by its ID, which is a GUID. You can basically reference this ID in APi calls that update or retrieve information about this envelope.
The following is the data structure of an envelope object:
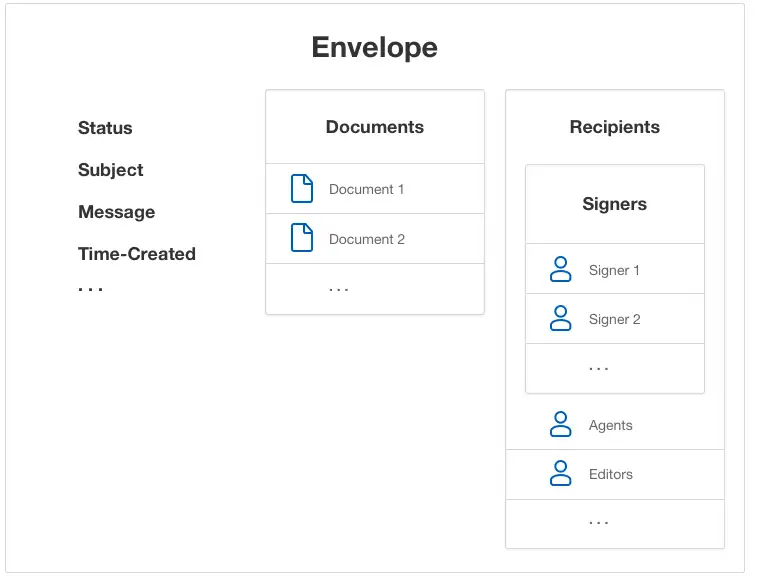
As you can see, it contains an array of documents, as well as Signers.
When you send an envelope, either by email or SMS, the Docusign platform notifies the recipients. This notification can be sent to recipients in a specific order or to all recipients at once.
Within Docusign’s system, the process of getting recipients to sign via email is called remote signing, whereas the process of getting them to sign directly through the app’s UI is called embedded signing
Alright, awesome. That’s enough knowledge of envelopes already, let’s see the process of how they’re created.
Returning to my code:
| |
let env = new docusign.EnvelopeDefinition();
This line basically creates a new envelope instance. You specify the emailSubject in the following line.
Then, you convert the document to base64 encoding. I don’t understand much about sending data over networks, so here’s what seems like a good explanation that I’ve found on stackoverflow:
When you have some binary data that you want to ship across a network, you generally don’t do it by just streaming the bits and bytes over the wire in a raw format. Why? because some media are made for streaming text. You never know – some protocols may interpret your binary data as control characters (like a modem), or your binary data could be screwed up because the underlying protocol might think that you’ve entered a special character combination (like how FTP translates line endings).
So to get around this, people encode the binary data into characters. Base64 is one of these types of encodings.
Why 64? Because you can generally rely on the same 64 characters being present in many character sets, and you can be reasonably confident that your data’s going to end up on the other side of the wire uncorrupted.
Okay. So in this case, we’re encoding the binary data into characters. Would love to do a quick example to see exactly what is being done here, but that’ll distract us from the main article so let’s carry on.
The next very important step is to create a document using the docusign.Document.constructFromObject({}) method. In this construction process, you specify the document in base64 format, a name of the document (which can be different from file name), the type of the file, and you give it an ID.
Once that is done, you add assign your doc to the envelope.
env.documents = [doc3];
The next steps are about creating the signer:
| |
So what is going on here? First, just like how you created a document, you’re using the docusign.Signer.constructFromObject({}) method to create a signer. The signer has a couple of attributes: email, name, a recipientId, and routingOrder. Apparently you can configure the envelop such that it can bounce between different participants along a routing chain! Pretty cool stuff.
Next, you create a carbonCopy recipient (final receiver of signed document) using the new docusign.CarbonCopy() method, specifying the same email and name.
It’s worthwhile noting that the recipientID is set to 2, meaning that they’re second to receive the envelope.
Finally, we create the sign here fields:
| |
So, the final part is about creating the actual “SignHere” fields in the document. The documents, by themselves, of course doesn’t contain the sign here fields. How this works is that docusign will search the document’s envelope to look for matching anchor strings. You’ll need to specify the anchorString: for the PDF file, it is /sn1/. I think I’ll need to experiment a little to get the specific mechanics of how the anchor tag is derived and found.
But the main idea here is that you’ll need to create tabs first using the docusign.Signhere.constructFromObject({}) method.
For the time being, here’s some supplementary info on how to locate the anchors at the right places on the page:
Best practices One common approach to anchor tagging is to use special strings that don’t appear anywhere else in the document as the anchorString property for anchor tagging, then setting the color of these strings to match the document background, making them invisible to recipients. This enables you to easily attach tabs to many places in your documents without disrupting the signing experience for your recipients.
For example, the string \s1\ could be used to indicate where signature tabs for the first recipient should be placed, and \i2\ could be used to indicate where initial tabs for the second recipient go.
Ah playing around with it slightly, I realized that in the example PDF document, there’s actually an invisible string /sn1/ set to white color lol. So the signature can replace the string here. Hacky but brilliant.
After you’ve created the Signhere tabs, you assign it to the right recipient using docusign.Tabs.constructFromObject, and then assign it to your signer1 object: signer1.tabs=signer1Tabs.
Finally, you define the recipients of your envelop:
| |
And after setting the status to “sent”, env.status = args.status;, you return the envlope, and that’s it!
You’ve created a complete envelope.
Sending an envelope
The makeEnvelope function is actually invoked within the sendEnvelope function. The sendEnvelope function is fairly straightforward:
| |
First, you define a docusign API client, and set the path and accessTokens.
Then, you make the envelope.
Finaly, you call the EnvelopesAPI create method, which sends the envelope to your recipients. Wow beautiful. According to the docs,
When the envelope is sent, the documents inside it will be delivered to the email address you specified for signing. The API returns the ID and status of the new envelope.
This is amazing. I actually this is about it for the integration, docusign takes care of the rest of the signature request lifecycle.
Time to try integrating it into my app and giving it a spin!